Continous Integration BW5.12/Jenkins - Part II
Jan 13, 2015That’s the second part for the topic “Continous Integration BW5.12/Jenkins”
This post describes how to pull/clone a GIT repository with Jenkins, and run to CLI commands to build and deploy a TIBCO BW process. The first part can be found here, describing the CLI commands and giving a short overview of the Jenkins install process.
All steps are done on an AWS Windows Server 2012 box, using BW (5.12), TRA (5.9), the latest Jenkins (1.596) and GIT (1.9.5).
As already mentioned, I will use GIT in this case as SCM (Source Code Management) to make things more interesting (you could leave SCM out and let Jenkins build directly from your local dir) we need to download Git from here and install it (leaving all default values). While writing this post version 1.9.5 of Git was the actual one.
Configure Jenkins to pull or clone a GIT repo
Install Jenkins Git Plugin from here.
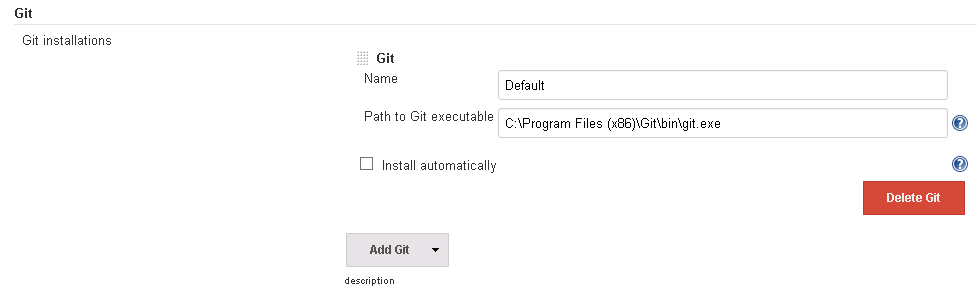
Now Jenkins needs to be told, where to find git (Manage Jenkins->Configure System, or http://localhost:6060/configure - remember to change the port to reflect your configuration).
If you get the error message “There’s no such executable git.exe in PATH” you have to enter the complete path to include your git executable (on my machine: “C:\Program Files (x86)\Git\bin\git.exe”) or update your PATH variable.
I will not dive deeper in detail how to integrate GIT with Jenkins, as there are already enough tutorials covering this topic (e.g. http://sanketdangi.com/post/62740311628/integrate-jenkins-github-trigger-build-process). In short steps:
- create new freestyle project in Jenkins
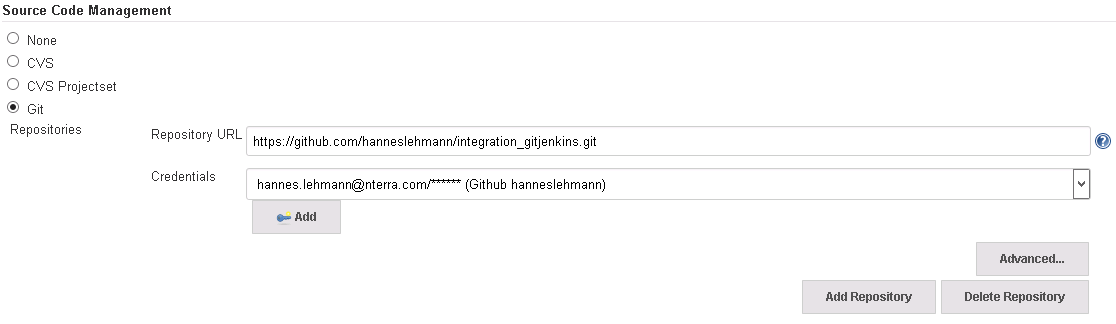
- choose Git as SCM
- Enter the needed config (repo-URL, credentials)
After creating some content in the repo, Jenkins should now be able to run the job (it only downloads content of the repo). Just try it to make sure the communication from Jenkins to GitHub.com works.
We will skip the part “trigger builds by commit/push”. Triggering jobs by commits would mean, that there is an access to your Jenkins URL from the outside (if you are using e.g. GitHub.com). I will check this out in an additional post, at the moment I am happy scheduling jobs manually or time triggered (as Jenkins offers).

So, now let’s add some build steps…
These steps are highly dependend on your repo structure: * will every BW project has it own GIT repo? * will the whole BW development happen in one GIT repo? * or any other organizational structures (team, milestone, project, …)
As well you will need some thoughts about naming convention of the repos.
Let’s make a switch to the other end, while you are thinking about the above mentioned questions, we will find out how to check-in / push an example BW project to the Github repo.
Push source code to SCM
As I created a github repo and I have already a bw project, I need to init git in the existing bw project (the parent folder of the archive file, not directly the same dir!).
C:\Users\User\Documents\bw5>git init
Initialized empty Git repository in C:/Users/User/Documents/bw5/.git/

C:\Users\User\Documents\bw5>git remote add origin https://github.com/hanneslehmann/integration_gitjenkins.git

C:\Users\User\Documents\bw5>git config --global user.email "hannes.lehmann@nterra.com"

C:\Users\User\Documents\bw5>git config --global user.name "Hannes"
Now you can use the standard git procedure (add/commit/push) to upload your code to the SCM.
To make thinks more visible, I installed a GUI for the source code handling called SourceTree
Configure build job
For the job we re-configure the workspace path under the button “advanced” of the build job (I had an already running job for testing the setup, I will re-cycle this).

Now, if you run the job, the content (the BW project) should be downloaded successfully to the defined folder.
Let’s build the ear file!
I am doing this with normal windows commands, as shown in Part I. No ant, no maven (at the moment).

We choose Execute Windows batch command and insert the command line we previously tested:
cd C:\tibco\tra\5.9\bin\buildear.exe -s -ear /helloworld_service.archive -o C:\jenkins\ears\helloworld_service.ear -p C:\jenkins\workspace\hello_world\helloworld_service

Pitfall: the buildear utility does not like any other files in the directory (even the hidden “.git” directory, or the README.md hurts! Be careful in planning your repo structure!)
Now we can hit the Jenkins build icon and when everything was configured properly, the ear file is build!
Sample Jenkins console output
Started by user admin
 > C:\Program Files (x86)\Git\bin\git.exe rev-parse --is-inside-work-tree # timeout=10
Fetching changes from the remote Git repository
 > C:\Program Files (x86)\Git\bin\git.exe config remote.origin.url https://github.com/hanneslehmann/integration_gitjenkins.git # timeout=10
Fetching upstream changes from https://github.com/hanneslehmann/integration_gitjenkins.git
 > C:\Program Files (x86)\Git\bin\git.exe --version # timeout=10
using .gitcredentials to set credentials
 > C:\Program Files (x86)\Git\bin\git.exe config --local credential.helper store --file=\"C:\Windows\TEMP\git8329605896234644724.credentials\" # timeout=10
 > C:\Program Files (x86)\Git\bin\git.exe fetch --tags --progress https://github.com/hanneslehmann/integration_gitjenkins.git +refs/heads/*:refs/remotes/origin/*
 > C:\Program Files (x86)\Git\bin\git.exe config --local --remove-section credential # timeout=10
 > C:\Program Files (x86)\Git\bin\git.exe rev-parse "refs/remotes/origin/master^{commit}" # timeout=10
 > C:\Program Files (x86)\Git\bin\git.exe rev-parse "refs/remotes/origin/origin/master^{commit}" # timeout=10
Checking out Revision c3c0893b9d4b81398a8f53c77a3c157b60275ab9 (refs/remotes/origin/master)
Unable to auto-install JDK until the license is accepted.
 > C:\Program Files (x86)\Git\bin\git.exe config core.sparsecheckout # timeout=10
 > C:\Program Files (x86)\Git\bin\git.exe checkout -f c3c0893b9d4b81398a8f53c77a3c157b60275ab9
 > C:\Program Files (x86)\Git\bin\git.exe rev-list c3c0893b9d4b81398a8f53c77a3c157b60275ab9 # timeout=10
Unable to auto-install JDK until the license is accepted.
[hello_world] $ cmd /c call C:\Windows\TEMP\hudson3427319450101485603.bat

C:\jenkins\workspace\hello_world>cd C:\tibco\tra\5.9\bin\

C:\tibco\tra\5.9\bin>buildear.exe -s -ear /helloworld_service.archive -o C:\jenkins\ears\helloworld_service.ear -p C:\jenkins\workspace\hello_world\helloworld_service
Starting up...

Enterprise Archive File has built correctly.
Ear created in: C:\jenkins\ears\helloworld_service.ear

C:\tibco\tra\5.9\bin>exit 0
Finished: SUCCESS
Create the deployment job
After this, I can create a second job (I created a copy of the first job and removed the SCM part), to get the deployment done. You could do everything in one job, but possibly you have multiple environments and you want to build the ear file undependent from the deployment.
Hint: use a naming convention / views in Jenkins to organize all your jobs!
The deployment job doesn’t need any configuration besides the “Build Step/Execute Windows Command” with following data (valid for my configuration):
cd C:\tibco\tra\5.9\bin\
AppManage -deploy -ear C:\jenkins\ears\helloworld_service.ear -deployconfig C:\jenkins\configs\hello_service-bw5_dev.xml -cred C:\jenkins\configs\cred_dev.txt -app TestServices/hello-service -domain bw5_dev
Deployment, output of Jenkins:
Started by user admin
BuildingUnable to auto-install JDK until the license is accepted.
 in workspace C:\jenkins\workspace\hello_world
Unable to auto-install JDK until the license is accepted.
[hello_world] $ cmd /c call C:\Windows\TEMP\hudson3803253491767647451.bat

C:\jenkins\workspace\hello_world>cd C:\tibco\tra\5.9\bin\

C:\tibco\tra\5.9\bin>AppManage -deploy -ear C:\jenkins\ears\helloworld_service.ear -deployconfig C:\jenkins\configs\hello_service-bw5_dev.xml -cred C:\jenkins\configs\cred_dev.txt -app TestServices/hello-service -domain bw5_dev
Checking if master server is responding ...
Finished checking
Initializing ...
Finished initialization
Loading archive ...
Finished loading archive
Configuring application ...
Finished configuring application
Deploying application ...

INFO : Received AgentInitialMsg: AgentInitialMsg [Agent=WIN-881H4D8KL83:none:bw5_dev:1421157162458:30] ## Tue Jan 13 15:09:57 CET 2015 ##
Instance helloworld_service created succesfully

Finished deploying application
Finished successfully in 37 seconds

C:\tibco\tra\5.9\bin>exit 0
Finished: SUCCESS
Let’s check the TIBCO Admin GUI:
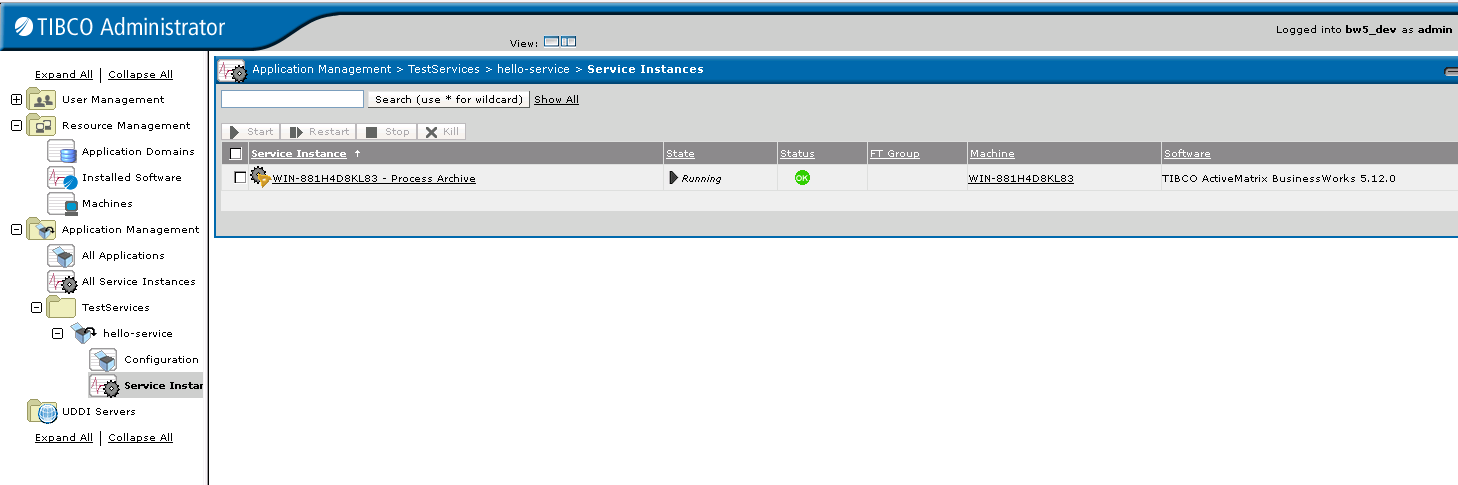
It worked!
From here: AppManage fails, if there is already a process with the same name. For update/upgrading existing processes, and the right packaging strategy, please refer to TIBCO guidelines!
I will follow up to add some more complexity, e.g. change some global variables during deployment.
As usual - if you have suggestions for more details, errors in text, just let me know, please!