Jan 13, 2015
That’s the second part for the topic “Continous Integration BW5.12/Jenkins”
This post describes how to pull/clone a GIT repository with Jenkins, and run to CLI commands to build and deploy a TIBCO BW process. The first part can be found here, describing the CLI commands and giving a short overview of the Jenkins install process.
All steps are done on an AWS Windows Server 2012 box, using BW (5.12), TRA (5.9), the latest Jenkins (1.596) and GIT (1.9.5).
As already mentioned, I will use GIT in this case as SCM (Source Code Management) to make things more interesting (you could leave SCM out and let Jenkins build directly from your local dir) we need to download Git from here and install it (leaving all default values). While writing this post version 1.9.5 of Git was the actual one.
Configure Jenkins to pull or clone a GIT repo
Install Jenkins Git Plugin from here.
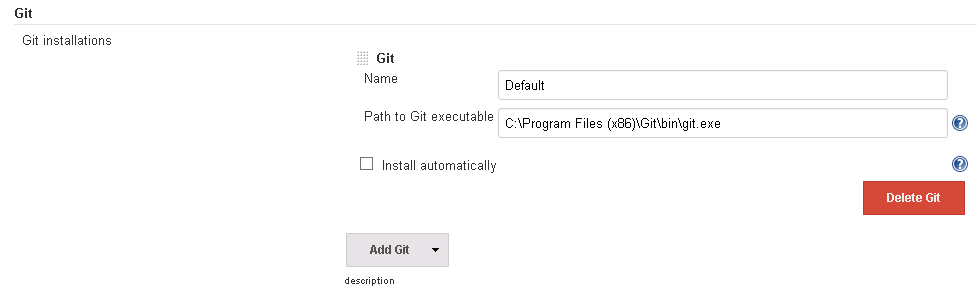
Now Jenkins needs to be told, where to find git (Manage Jenkins->Configure System, or http://localhost:6060/configure - remember to change the port to reflect your configuration).
If you get the error message “There’s no such executable git.exe in PATH” you have to enter the complete path to include your git executable (on my machine: “C:\Program Files (x86)\Git\bin\git.exe”) or update your PATH variable.
I will not dive deeper in detail how to integrate GIT with Jenkins, as there are already enough tutorials covering this topic (e.g. http://sanketdangi.com/post/62740311628/integrate-jenkins-github-trigger-build-process). In short steps:
- create new freestyle project in Jenkins
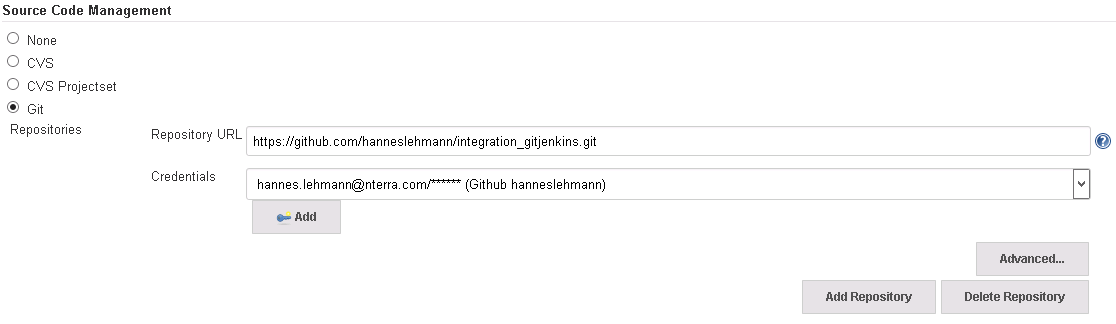
- choose Git as SCM
- Enter the needed config (repo-URL, credentials)
After creating some content in the repo, Jenkins should now be able to run the job (it only downloads content of the repo). Just try it to make sure the communication from Jenkins to GitHub.com works.
We will skip the part “trigger builds by commit/push”. Triggering jobs by commits would mean, that there is an access to your Jenkins URL from the outside (if you are using e.g. GitHub.com). I will check this out in an additional post, at the moment I am happy scheduling jobs manually or time triggered (as Jenkins offers).

So, now let’s add some build steps…
These steps are highly dependend on your repo structure:
* will every BW project has it own GIT repo?
* will the whole BW development happen in one GIT repo?
* or any other organizational structures (team, milestone, project, …)
As well you will need some thoughts about naming convention of the repos.
Let’s make a switch to the other end, while you are thinking about the above mentioned questions, we will find out how to check-in / push an example BW project to the Github repo.
Push source code to SCM
As I created a github repo and I have already a bw project, I need to init git in the existing bw project (the parent folder of the archive file, not directly the same dir!).
C:\Users\User\Documents\bw5>git init
Initialized empty Git repository in C:/Users/User/Documents/bw5/.git/

C:\Users\User\Documents\bw5>git remote add origin https://github.com/hanneslehmann/integration_gitjenkins.git

C:\Users\User\Documents\bw5>git config --global user.email "hannes.lehmann@nterra.com"

C:\Users\User\Documents\bw5>git config --global user.name "Hannes"
Now you can use the standard git procedure (add/commit/push) to upload your code to the SCM.
To make thinks more visible, I installed a GUI for the source code handling called SourceTree
Configure build job
For the job we re-configure the workspace path under the button “advanced” of the build job (I had an already running job for testing the setup, I will re-cycle this).

Now, if you run the job, the content (the BW project) should be downloaded successfully to the defined folder.
Let’s build the ear file!
I am doing this with normal windows commands, as shown in Part I. No ant, no maven (at the moment).

We choose Execute Windows batch command and insert the command line we previously tested:
cd C:\tibco\tra\5.9\bin\buildear.exe -s -ear /helloworld_service.archive -o C:\jenkins\ears\helloworld_service.ear -p C:\jenkins\workspace\hello_world\helloworld_service

Pitfall: the buildear utility does not like any other files in the directory (even the hidden “.git” directory, or the README.md hurts! Be careful in planning your repo structure!)
Now we can hit the Jenkins build icon and when everything was configured properly, the ear file is build!
Sample Jenkins console output
Started by user admin
 > C:\Program Files (x86)\Git\bin\git.exe rev-parse --is-inside-work-tree # timeout=10
Fetching changes from the remote Git repository
 > C:\Program Files (x86)\Git\bin\git.exe config remote.origin.url https://github.com/hanneslehmann/integration_gitjenkins.git # timeout=10
Fetching upstream changes from https://github.com/hanneslehmann/integration_gitjenkins.git
 > C:\Program Files (x86)\Git\bin\git.exe --version # timeout=10
using .gitcredentials to set credentials
 > C:\Program Files (x86)\Git\bin\git.exe config --local credential.helper store --file=\"C:\Windows\TEMP\git8329605896234644724.credentials\" # timeout=10
 > C:\Program Files (x86)\Git\bin\git.exe fetch --tags --progress https://github.com/hanneslehmann/integration_gitjenkins.git +refs/heads/*:refs/remotes/origin/*
 > C:\Program Files (x86)\Git\bin\git.exe config --local --remove-section credential # timeout=10
 > C:\Program Files (x86)\Git\bin\git.exe rev-parse "refs/remotes/origin/master^{commit}" # timeout=10
 > C:\Program Files (x86)\Git\bin\git.exe rev-parse "refs/remotes/origin/origin/master^{commit}" # timeout=10
Checking out Revision c3c0893b9d4b81398a8f53c77a3c157b60275ab9 (refs/remotes/origin/master)
Unable to auto-install JDK until the license is accepted.
 > C:\Program Files (x86)\Git\bin\git.exe config core.sparsecheckout # timeout=10
 > C:\Program Files (x86)\Git\bin\git.exe checkout -f c3c0893b9d4b81398a8f53c77a3c157b60275ab9
 > C:\Program Files (x86)\Git\bin\git.exe rev-list c3c0893b9d4b81398a8f53c77a3c157b60275ab9 # timeout=10
Unable to auto-install JDK until the license is accepted.
[hello_world] $ cmd /c call C:\Windows\TEMP\hudson3427319450101485603.bat

C:\jenkins\workspace\hello_world>cd C:\tibco\tra\5.9\bin\

C:\tibco\tra\5.9\bin>buildear.exe -s -ear /helloworld_service.archive -o C:\jenkins\ears\helloworld_service.ear -p C:\jenkins\workspace\hello_world\helloworld_service
Starting up...

Enterprise Archive File has built correctly.
Ear created in: C:\jenkins\ears\helloworld_service.ear

C:\tibco\tra\5.9\bin>exit 0
Finished: SUCCESS
Create the deployment job
After this, I can create a second job (I created a copy of the first job and removed the SCM part), to get the deployment done. You could do everything in one job, but possibly you have multiple environments and you want to build the ear file undependent from the deployment.
Hint: use a naming convention / views in Jenkins to organize all your jobs!
The deployment job doesn’t need any configuration besides the “Build Step/Execute Windows Command” with following data (valid for my configuration):
cd C:\tibco\tra\5.9\bin\
AppManage -deploy -ear C:\jenkins\ears\helloworld_service.ear -deployconfig C:\jenkins\configs\hello_service-bw5_dev.xml -cred C:\jenkins\configs\cred_dev.txt -app TestServices/hello-service -domain bw5_dev
Deployment, output of Jenkins:
Started by user admin
BuildingUnable to auto-install JDK until the license is accepted.
 in workspace C:\jenkins\workspace\hello_world
Unable to auto-install JDK until the license is accepted.
[hello_world] $ cmd /c call C:\Windows\TEMP\hudson3803253491767647451.bat

C:\jenkins\workspace\hello_world>cd C:\tibco\tra\5.9\bin\

C:\tibco\tra\5.9\bin>AppManage -deploy -ear C:\jenkins\ears\helloworld_service.ear -deployconfig C:\jenkins\configs\hello_service-bw5_dev.xml -cred C:\jenkins\configs\cred_dev.txt -app TestServices/hello-service -domain bw5_dev
Checking if master server is responding ...
Finished checking
Initializing ...
Finished initialization
Loading archive ...
Finished loading archive
Configuring application ...
Finished configuring application
Deploying application ...

INFO : Received AgentInitialMsg: AgentInitialMsg [Agent=WIN-881H4D8KL83:none:bw5_dev:1421157162458:30] ## Tue Jan 13 15:09:57 CET 2015 ##
Instance helloworld_service created succesfully

Finished deploying application
Finished successfully in 37 seconds

C:\tibco\tra\5.9\bin>exit 0
Finished: SUCCESS
Let’s check the TIBCO Admin GUI:
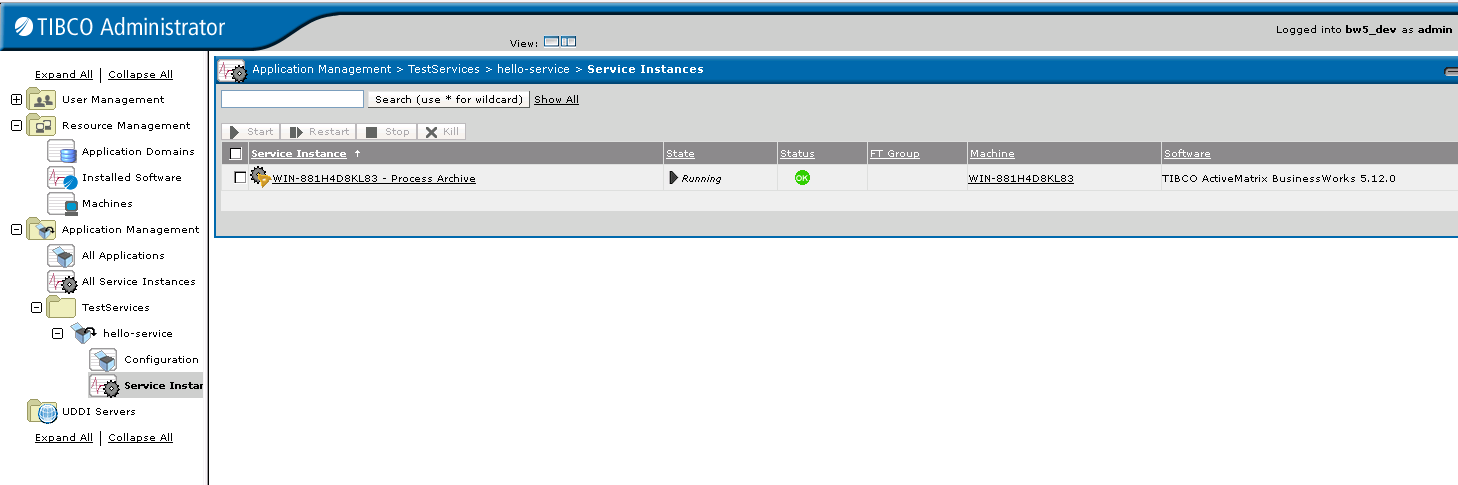
It worked!
From here: AppManage fails, if there is already a process with the same name. For update/upgrading existing processes, and the right packaging strategy, please refer to TIBCO guidelines!
I will follow up to add some more complexity, e.g. change some global variables during deployment.
As usual - if you have suggestions for more details, errors in text, just let me know, please!
Jan 3, 2015
- Setup: This how-to was done using a Linux-PC (LMDE-Linux Mint Debian).
- Scope: PoC with LUA Firmware.
Using GtkTerm on Linux make sure that the configuration of the baudrate is set to 115200 (file: “~/.gtktermrc”).
[default]
port	= /dev/ttyUSB1
speed	= 115200
To get the LUA firmware for the esp8266 module (version ESP-01):
git clone https://github.com/nodemcu/nodemcu-firmware.git
Copy the file “nodemcu_512k_latest.bin” from folder pre_build/latest and connect GPIO0 to low; after that restart the module (with GPIO0 to low it boots to flashable mode). How the connection from USB to the module can be done has been documented in a (previous post)[http://hanneslehmann.github.io/2014/12/ESP8266Module/].
Open a linux terminal, navigate to the already known Python script for flashing the firmware:
./esptool.py -p /dev/ttyUSB1 write_flash 0x000000 nodemcu_512k_latest.bin

Connecting...
Erasing flash...
Writing at 0x0007ef00... (100 %)

Leaving...
Change baudrate of gtkterm:
[default]
port	= /dev/ttyUSB1
speed	= 9600
Now opening again GtkTerm you can enter commands (note: every line is a command, the sign “>” indicates that the module expects a lua command).
> wifi.setmode(wifi.STATION)
> wifi.sta.config("mywifi","mypass")
stdin:1: unexpected symbol near 'char(27)'

> print(wifi.sta.getip())
stdin: bad header in precompiled chunk
> print(wifi.sta.getip())
192.168.1.9
>
Ok! This seemed to work, our esp8266 module is connected to our network (and has the ip 192.168.1.9)!
If you get some errors like “stdin:1: unexpected symbol near ‘char(27)’” or “stdin: bad header in precompiled chunk” then your terminal doesn’t support backspace or arrow input (either copy&paste issue, or you have done a correction of your input). Don’t worry, just repeat the command.
I then copy and pasted the example for the simple http server from here; note: it even worked without correct line breaks!
> srv=net.createServer(net.TCP) srv:listen(80,function(conn) conn:on("receive",function(conn,payload) print(payload) conn:send("<h1> Hello, NodeMcu.</h1>") end) conn:on("sent",function(conn) conn:close() end) end)
After browsing to http://192.168.15.9/ I get the expected response “Hello, NodeMcu.” and following log entries in the terminal:
> GET / HTTP/1.1
Host: 192.168.1.9
User-Agent: Mozilla/5.0 (X11; Linux x86_64; rv:34.0) Gecko/20100101 Firefox/34.0
Accept: text/html,application/xhtml+xml,application/xml;q=0.9,*/*;q=0.8
Accept-Language: de,en-US;q=0.7,en;q=0.3
Accept-Encoding: gzip, deflate
Connection: keep-alive


GET /favicon.ico HTTP/1.1
Host: 192.168.1.9
User-Agent: Mozilla/5.0 (X11; Linux x86_64; rv:34.0) Gecko/20100101 Firefox/34.0
Accept: text/html,application/xhtml+xml,application/xml;q=0.9,*/*;q=0.8
Accept-Language: de,en-US;q=0.7,en;q=0.3
Accept-Encoding: gzip, deflate
Connection: keep-alive


GET /favicon.ico HTTP/1.1
Host: 192.168.1.9
User-Agent: Mozilla/5.0 (X11; Linux x86_64; rv:34.0) Gecko/20100101 Firefox/34.0
Accept: image/png,image/*;q=0.8,*/*;q=0.5
Accept-Language: de,en-US;q=0.7,en;q=0.3
Accept-Encoding: gzip, deflate
Connection: keep-alive
To restart the module the command node.restart() can be used.
>node.restart()
> �Z�0�
G���fR�f�� ��C�NodeMcu 0.9.4 build 20141230 powered by Lua 5.1.4
lua: cannot open init.lua
>
What happened? Our previous configured webserver vanished!! To make something permanent, the boot up message gives the hint: we need an “init.lua” file which is executed at the start and can be used to setup the module with the needed commands.
But even if the webserver vanished, the settings for the home/wifi access have been stored, and after reboot of the module it reconnects automatically!
To make things easier, let’s use a small python script for uploading lua script files to esp8266:
git clone https://github.com/4refr0nt/luatool.git
This tool can be used to write a file into the wifi module, as it automates sending the file line by line.
Sample usage:
./luatool.py --port /dev/ttyUSB1 --src init.lua --dest init.lua --verbose
Attention: don’t forget to close your Serial monitor, otherwise the tool might not get the responses from the module and quit working (or disable the check)!
To solve my previous problem (arduino not getting the full message from the module, see post from 30DEC) I now created a lua.init file which I uploaded to route through the commands sent by tcp.
From the linux box I now can send a message like:
echo 'Hello' > /dev/tcp/192.168.1.9/2323
and it will be send to the serial output of the module.
I will keep on going to check out this nice little module (already ordered a new version with some more GPIOs).
Please let me know in case of any questions or clarifications needed!
Dec 30, 2014
- Setup: This how-to was done using a Linux-PC (LMDE-Linux Mint Debian).
- Scope: first communication test with the module over wifi.
To try out the ESP8266 module I connected an USB-to-serial adapter which I ordered via the bay (“USB RS232 Serial TTL PL2303HX UART”).

It was possible to reconnect the 5V power supply from USB within the module (just opened it) to the 3.3 Volt needed for the module.

I wired up the module with the USB adapter; connected PIN CH_PD to VCC (3.3 Volt) and connected to PC. Red light goes on, blue flashes shortly.

| Label |
Signal |
| VCC |
3.3V (max 3.6V) |
| GND |
Ground |
| TXD |
Transmit Data (3.3V) |
| RXD |
Receive Data (3.3V) |
| CH_PD |
Chip Power down: (LOW = Power down active) |
| GPIO0 |
General Purpose I/O 0 |
| GPIO2 |
General Purpose I/O 2 |
| RST |
Reset (LOW = Reset active) |
 The picture is not the best - the yellow bounded cable connects CH_PD with VCC. The green connector from the USB-Serial-Converter goes to RXD, and the white to TXD.
After connecting the USB-Serial-Converter, my Linux shows following dmesg log:
[23081.471573] usb 1-3: New USB device found, idVendor=067b, idProduct=2303
[23081.471575] usb 1-3: New USB device strings: Mfr=1, Product=2, SerialNumber=0
[23081.471576] usb 1-3: Product: USB-Serial Controller
[23081.471577] usb 1-3: Manufacturer: Prolific Technology Inc.
[23081.471957] pl2303 1-3:1.0: pl2303 converter detected
[23081.472510] usb 1-3: pl2303 converter now attached to ttyUSB1
I installed GtkTerm via
sudo apt-get install gtkterm
I made sure the config file of gtkterm: “.gtktermrc” in my home folder contains the right config for my setup (in fact I needed to change the port and speed config):
[default]
port	= /dev/ttyUSB1
speed	= 115200
bits	= 8
stopbits	= 1
parity	= none
flow	= none
wait_delay	= 0
wait_char	= -1
rs485_rts_time_before_tx	= 30
rs485_rts_time_after_tx	= 30
echo	= False
crlfauto	= False
font	= "Nimbus Mono L, 14"
term_transparency	= False
term_show_cursor	= True
term_rows	= 80
term_columns	= 25
term_scrollback	= 200
term_visual_bell	= True
term_foreground_red	= 43253
term_foreground_blue	= 43253
term_foreground_green	= 43253
term_background_red	= 0
term_background_blue	= 0
term_background_green	= 0
term_background_saturation	= 0,500000
Now I was ready to play around with gtkterm. Actually my terminal was showing nothing, until I typed the first command (AT). For details about the below mentioned commandos (all starting with AT) - please visit: https://nurdspace.nl/ESP8266#AT_Commands or this website
AT

OK
AT+RST

OK

 ets Jan  8 2013,rst cause:4, boot mode:(3,7)

wdt reset
load 0x40100000, len 24444, room 16
tail 12
chksum 0xe0
ho 0 tail 12 room 4
load 0x3ffe8000, len 3168, room 12
tail 4
chksum 0x93
load 0x3ffe8c60, len 4956, room 4
tail 8
chksum 0xbd
csum 0xbd

ready

AT+GMR
00160901

OK
AT?
no this fun
AT+CWMODE?
+CWMODE:2

OK
AT+CWMODE=3

OK
AT+CWMODE?
+CWMODE:3

OK
AT+CWLAP
+CWLAP:(0,"",0)
+CWLAP:(4,"wifi1",-86)
+CWLAP:(3,"wifi2",-72)
+CWLAP:(3,"wifi3",-83)
+CWLAP:(3,"mywifi",-63)

OK
AT+CWJAP="mywifi","mypass"

OK
AT+CIFSR
192.168.1.20
After above commandos the module is connected with my home wifi (“mywifi”) which is secured with a password. The IP adress of the module is “192.168.1.20” (automatically received by the DHCP of the wifi router). Now I will start a TCP server listening on Port 8001 on the module (timeout is set to 180 sec because the module handles only a limited number of connections; we might free some long running idle ones):
OK
AT+CIPSERVER=1,8001

OK
AT+CIPSTO=180
On the linux box I open a terminal; started a telnet connection; entered the message “Helo” and pressed >enter<:
telnet 192.168.15.20 8001
Trying 192.168.15.20...
Connected to 192.168.15.20.
Escape character is '^]'.
Helo
In the serial monitor (gtkterm) I can see the terminal receiving the message:
Link

+IPD,0,6:Helo

OK
That’s it!
Next step is to have an arduino react/respond on tcp messages.
After consulting some forums in the internet I have read, that some additional preparation of the module is needed to talk with arduino (downgrade baudrate of the module). By the way - some alternative firmware exists for running LUA and/or even a webserver on the module using the GPIOs directly. But I want to talk to the Arduino Nano, so I need the following steps.
Clone the flash utility:
git clone https://github.com/themadinventor/esptool.git
Get the firmware esp8266.9.2.2.bin or here and unzip it to the folder of the esptool.
Now connect GPIO0 to low and restart the module (with GPIO0 to low it boots to flashable mode).
Trying to run the flash utility gave me an error (note that my serial converter sits on USB1, your setup might be different!):
./esptool.py -p /dev/ttyUSB1 write_flash 0x000000 v0.9.2.2\ AT\ Firmware.bin
Traceback (most recent call last):
  File "./esptool.py", line 22, in <module>
    import serial
ImportError: No module named serial
So I had to install the python serial modul via pip:
sudo pip install pyserial
Downloading/unpacking pyserial
  Downloading pyserial-2.7.tar.gz (122kB): 122kB downloaded
  Running setup.py egg_info for package pyserial

Installing collected packages: pyserial
  Running setup.py install for pyserial
    changing mode of build/scripts-2.7/miniterm.py from 644 to 755

    changing mode of /usr/local/bin/miniterm.py to 755
Successfully installed pyserial
Cleaning up...
After that I was able to flash the firmware:
 ./esptool.py -p /dev/ttyUSB1 write_flash 0x000000 v0.9.2.2\ AT\ Firmware.bin
Connecting...
Erasing flash...
Writing at 0x0007ef00... (100 %)

Leaving...
Now we have to change the baudrate for gtkterm (see above for the details) and restart gtkterm:
[default]
port	= /dev/ttyUSB1
speed	= 9600
bits	= 8
stopbits	= 1
parity	= none
...
One thing has changed for the communication with the module after the upgrade: after every command entered in gtkterm, not only Return has to be hit, but additionally Ctrl + J as well (CR+LF). So what do we get? Let’s change the baudrate to 57600:
AT

OK
AT+GMR
0018000902

OK
AT+CIOBAUD?
+CIOBAUD:9600

OK
AT+CIOBAUD=57600
BAUD->57600

OK
R
-> reconfigure & restart gtkterm!
As the new firmware changed some settings, we need to issue some more commands to get our tcp server back online (this time on ip 192.168.1.25….):
AT+CIPMUX?
+CIPMUX:0

OK
AT+CIPMUX=1

OK
AT+CIPMUX?

+CIPMUX:1

OK
AT+CIPSERVER=1,8001

OK
AT+CIFSR

192.168.4.1
192.168.1.25

OK
Link

+IPD,0,6:helo

OK
Now I will be ready to connect the Arduino Nano to my wifi module!
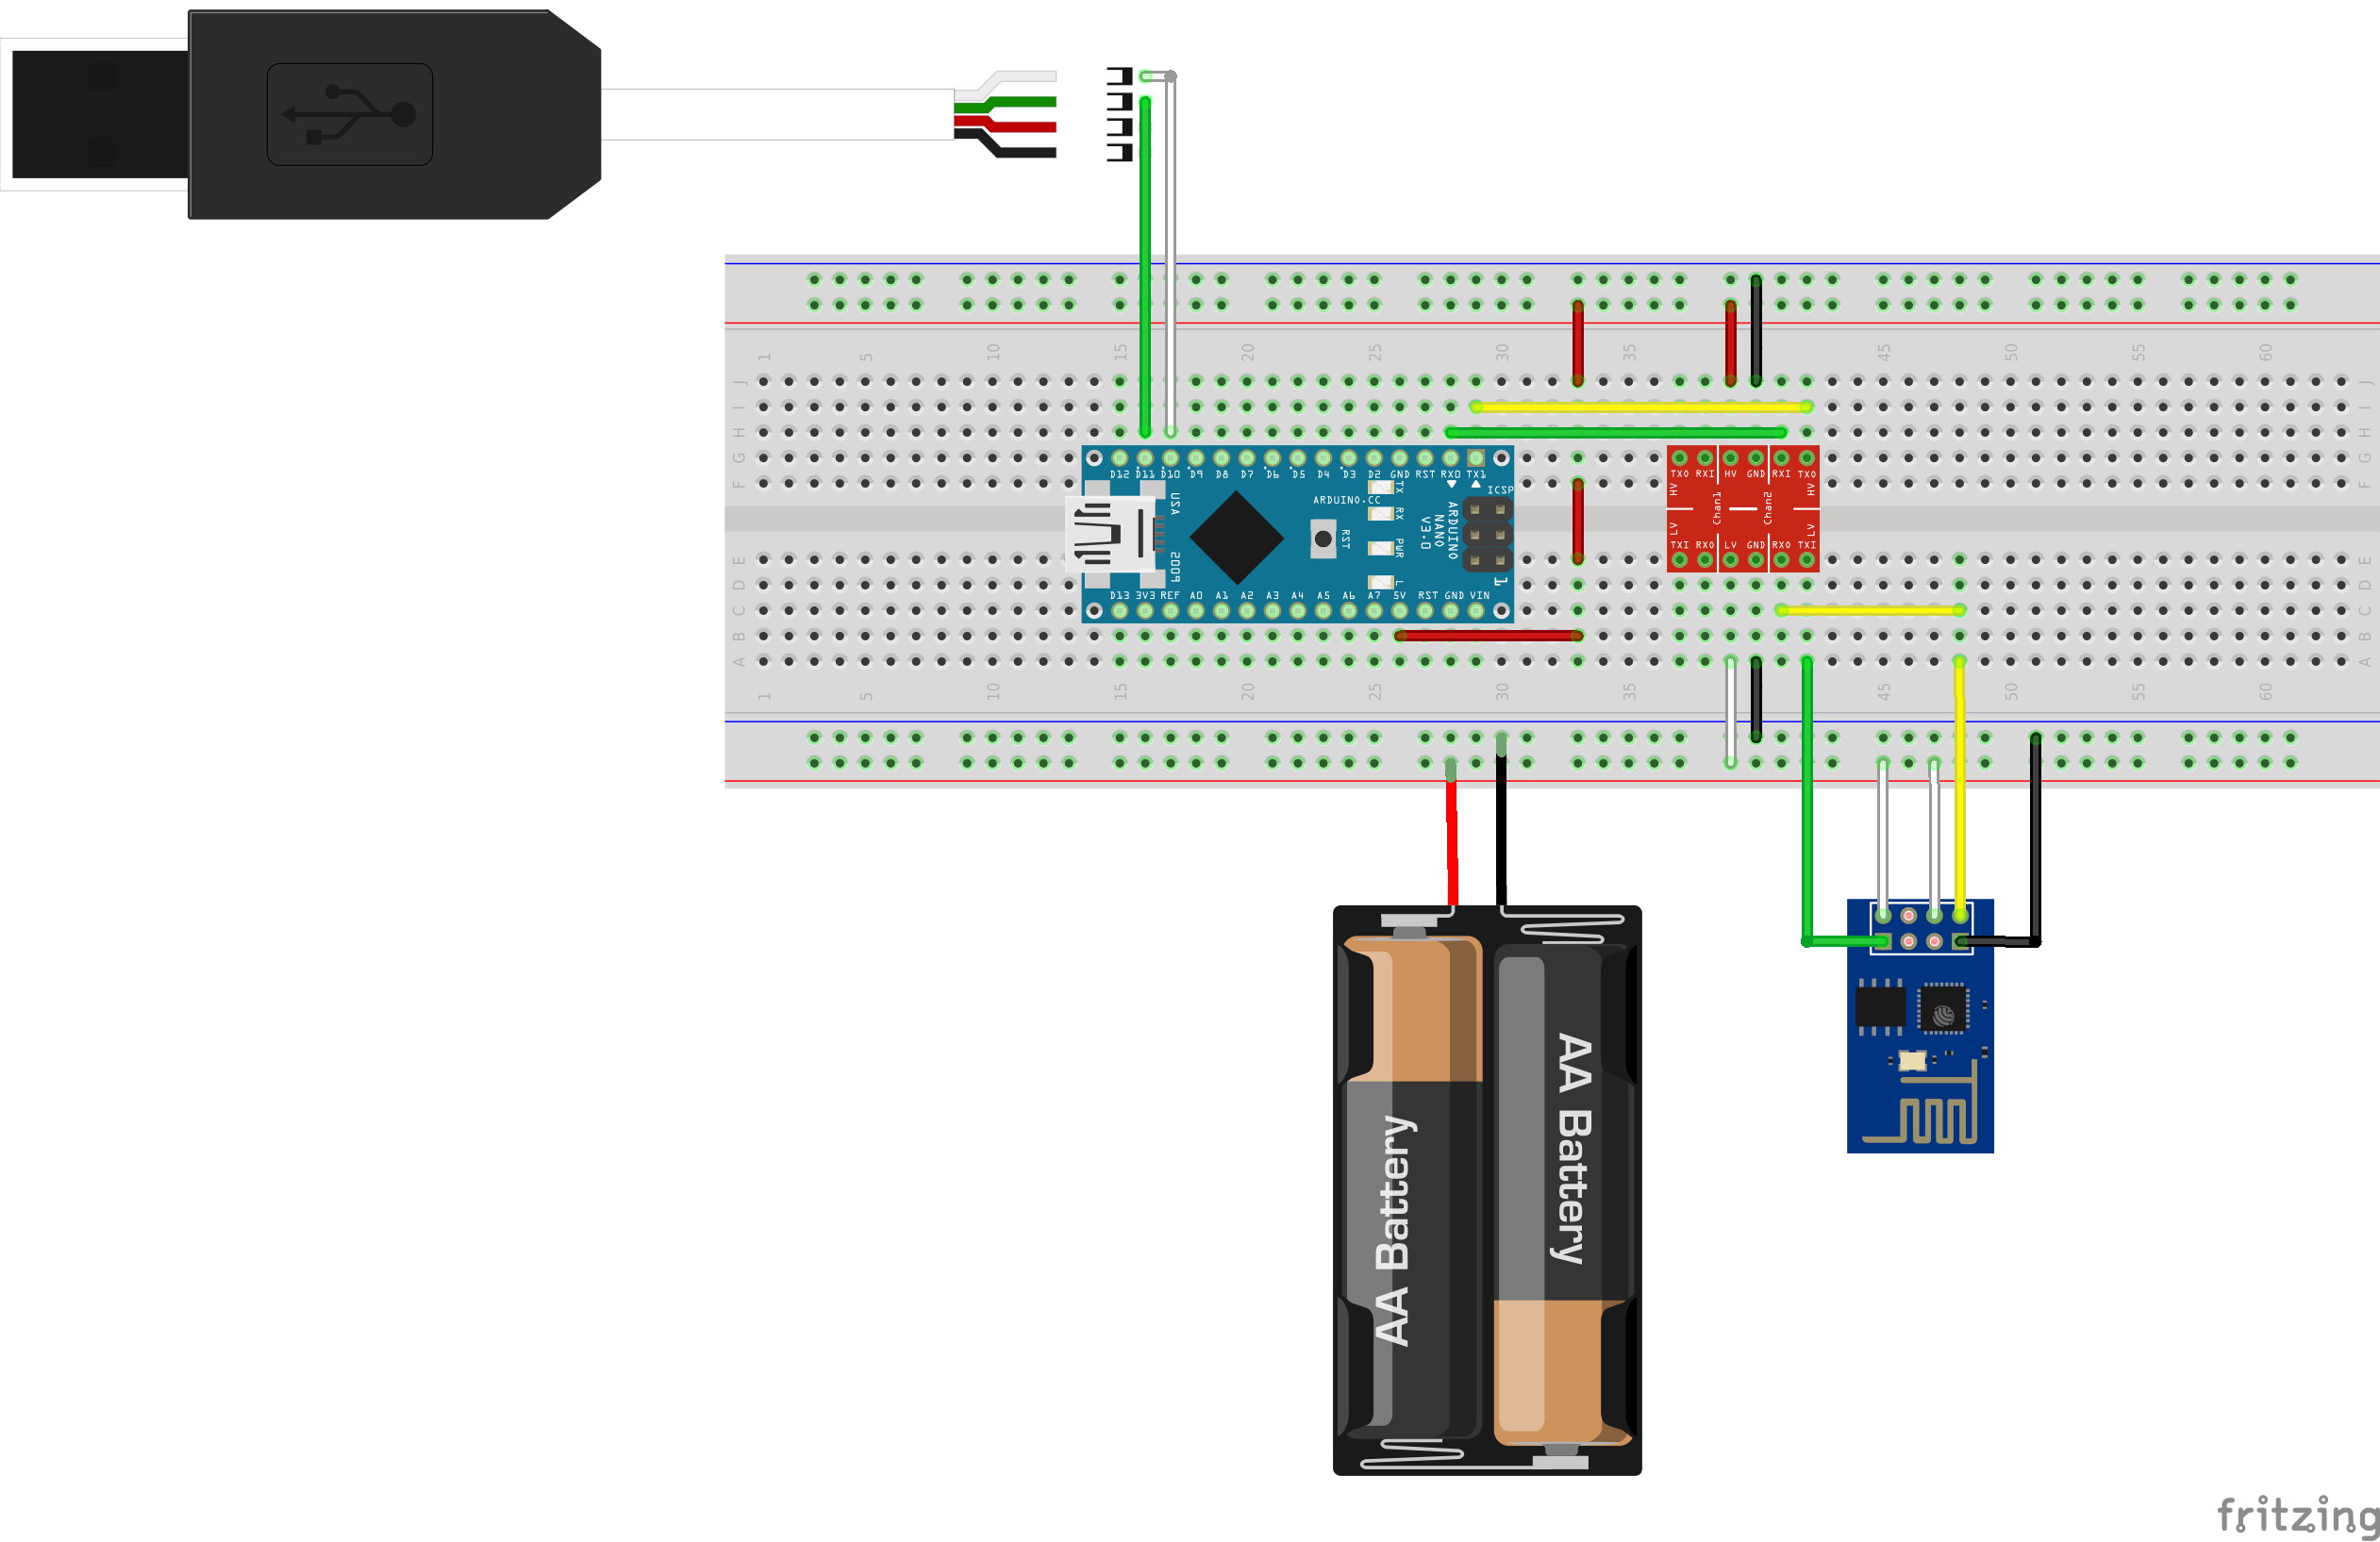
Connecting Arduino Nano is done really easily, with one level shifter (a resistor should work as well). I connected additionally the USB-Serial-Converter to the SoftSerial Arduino to see debug messages.
The Arduino is powered through the USB connection to the PC. During upload of the Arduino Sketch, the serial connection to the Wifi module has to be removed and reconnected afterwards.
I have pulled the CH_PD Pin to VCC, first with resistor (10k) then without. Without it was working more stable for me. Here the big picture:

What we now need is the corresponding Arduino Sketch. I will upload it soon to my GitHub repo - here the first draft, inspired by Ray Wang @ Rayshobby LLC
/* ====== ESP8266 TCP Demo ======
 * Receive & Respond via TCP
 * (Updated Dec 30, 2014)
 * ==========================
 *
 * Change SSID and PASS to match your WiFi settings.
 * The IP address is displayed to soft serial upon successful connection.
 *
 * Inspired by
 * Ray Wang @ Rayshobby LLC
 * http://rayshobby.net/?p=9734
 * http://raysfiles.com/arduino/ESP8266a_arduino.ino
 */

#include <SoftwareSerial.h>

#define BUFFER_SIZE 512
#define esp Serial
#define SSID  "mywifi"      // change this to match your WiFi SSID
#define PASS  "mypassword"     // change this to match your WiFi password
#define PORT  "8001"          // using port 8001 by default

char buffer[BUFFER_SIZE];

// Software Serial for debug
SoftwareSerial dbg(10,11);  // use pins 10, 11 for software serial

// By default we are looking for OK\r\n
char OKrn[] = "OK\r\n";

// LED Pin
const int LED = 13;


byte wait_for_esp_response(int timeout, char* term=OKrn) {
  unsigned long t=millis();
  bool found=false;
  int i=0;
  int len=strlen(term);
  // wait for at most timeout milliseconds
  // or if OK\r\n is found
  while(millis()<t+timeout) {
    if(esp.available()) {
      buffer[i++]=esp.read();
      if(i>=len) {
        if(strncmp(buffer+i-len, term, len)==0) {
          found=true;
          break;
        }
      }
    }
  }
  buffer[i]=0;
  dbg.print(buffer);
  return found;
}

void setup() {

  // assume esp8266 operates at 57600 baud rate
  // change if necessary to match your modules' baud rate
  esp.begin(57600);

  dbg.begin(9600);
  dbg.println("begin.");

  // Setup LED PIN as output
  pinMode(LED, OUTPUT);

  // blink test
  digitalWrite(LED, HIGH); // LED on
  delay(500); // 500 ms delay
  digitalWrite(LED, LOW); // LED off

  setupWiFi();

  // print device IP address
  dbg.print("device ip addr:");
  esp.println("AT+CIFSR");
  wait_for_esp_response(1000);
}

bool read_till_eol() {
  char incomingByte = 0;   // for incoming serial data
  static int i=0;
  if(esp.available()>0) {
    incomingByte = esp.read();
      buffer[i++]=incomingByte;
      if(i==BUFFER_SIZE)  i=0;
      if(i>1 && buffer[i-2]==13 && buffer[i-1]==10) {
        buffer[i]=0;
        i=0;
        dbg.print(buffer);
        return true;
    }
  }
  return false;
}

void loop() {
  int ch_id, packet_len;
  char *pb;
  if(read_till_eol()) {
    dbg.println("----------------------------------");
    if(strncmp(buffer, "+IPD,", 5)==0) {
      // request: +IPD,ch,len:data
      sscanf(buffer+5, "%d,%d", &ch_id, &packet_len);
      if (packet_len > 0) {
        // read serial until packet_len character received
        // start from :
        pb = buffer+5;
        while(*pb!=':') pb++;
        pb++;
        dbg.print("Message received: ");
        dbg.println(pb);
        send_Response(ch_id, "ACK");
        if (strncmp(pb, "LEDON", 5) == 0) {
          digitalWrite(LED, HIGH); // LED on
        }
        if (strncmp(pb, "LEDOFF", 6) == 0){
          digitalWrite(LED, LOW); // LED on
        }
      }
    }
  }
}


void send_Response(int ch_id, String content) {
  esp.print("AT+CIPSEND=");
  esp.print(ch_id);
  esp.print(",");
  esp.println(content.length());
  if(wait_for_esp_response(2000, "> ")) {
    esp.print(content);
  } else {
    esp.print("AT+CIPCLOSE=");
    esp.println(ch_id);
  }
}


void setupWiFi() {
  // try empty AT command
  esp.println("AT");
  wait_for_esp_response(1000);

  // set mode 1 (client)
  esp.println("AT+CWMODE=1");
  wait_for_esp_response(1000);

  // reset WiFi module
  esp.print("AT+RST\r\n");
  wait_for_esp_response(1500);

  // join AP
  esp.print("AT+CWJAP=\"");
  esp.print(SSID);
  esp.print("\",\"");
  esp.print(PASS);
  esp.println("\"");
  // this may take a while, so wait for 5 seconds
  wait_for_esp_response(5000);

  esp.println("AT+CIPSTO=30");
  wait_for_esp_response(1000);

  // start server
  esp.println("AT+CIPMUX=1");
  wait_for_esp_response(1000);

  esp.print("AT+CIPSERVER=1,"); // turn on TCP service
  esp.println(PORT);
  wait_for_esp_response(1000);


}
A little success: Arduino sends correctly the AT commands to connect to the network! It receives an IP adress, I even can telnet to it!
I can see (on the debug serial) following commands running through:
begin.
AT
OK
AT+CWMODE=1
no change
AT+RST
OK
AT+CWJAP="mywlan","mypassword"
B�
r�Ĥ���HB߬!{�����1�!�+!��B(�C)����B�B1�c+&ƅ��"�C�*�B����!(��9*)%�DŽ�b�c����Cx��B)�!���r�,%��D��c����C�!愆D
[System Ready, Vendor:www.ai-thinker.com]
AT+CIPSTO=30
ERROR
AT+CIPMUX=1
OK
AT+CIPSERVER=1,8080
OK
device ip addr:AT+CIFSR
192.168.1.30
OK
What does not work?
I wanted to switch the on-board LED of the Arduino via TCP commands (“LEDON” / “LEDOFF”) but at the moment I am struggling with the communication from the esp8266 to the Arduino. Sending the message “Hello” through a telnet terminal, I can see that the Wifi module is sending the complete message: “+IPD,0,7:Hello” but only a crippled message is received by the Arduino “+0lloOK”.
….to be continued….
If you run into problems or if you have any suggestions for the mistakes I have made, please leave a comment!
Dec 3, 2014
First some pre-requisites.
The workflow of a Continous Integration with BW would be (GIT is used in this case, same thing can be done with SVN or other source control tools as well):
Developer:
- Tibco Designer —-> create & save —-> Project
- Project — push to repo — > GIT
Jenkins:
- GIT — clone project locally to—> project_dir
- buildear — create deployment artifact to —> project_dir/app.ear
- AppManage — extract config from ear into —> project_dir/app_config.xml
- Script (Ant, bash,..) — modify configs within —> project_dir/app_config.xml
- AppManage — combine ear and configs —> deploy to BW domain
- GIT? —> commit/push deployment artifacts together with config
The Jenkins job can be run manually, scheduled or, if configured correctly, with the source control system, on every check-in/push.
This article covers only a really abstraced view on the process, which can grow to complexity. Only some random thoughts what has to be clearly defined before setting up CI (without beeing complete):
- The CLI tool chain from TIBCO is needed on the same box, where the applications are build (either on a Jenkins bot, or some remote scripting…), how can this be achieved (Licences..?)
- Build strategy: how is the branching/staging done? So, we need to tell Jenkins what to check out from where/when (on every build?) Manually if new branches are created?
- The target environment: how many staging boxes are there (Dev, Test, UAT, Prod)? Should the build be done automatically on which ones? Is there access from Jenkins (or it’s bots to all the needed machines?)
- Any quality assurance before deployment? Source code checks (e.g. naming conventions, comments,…), automated testing?
- What happens in a case of failure? What would be the way to recover a (former) working version of the application?
- How can new jobs be added to Jenkins? Any Administrator/Ops Team? Automated?
- Any automated reports needed?
Following steps have been done on a Windows Box (AWS Windows Server 2012).
Jenkins installation
- Go to Jenkins Homepage: http://jenkins-ci.org/
- Download Windows Package / Unzip and start >setup.exe<
- Choose the installation directory. After setup is completed (on my box) a browser pops up, showing Jenkins waiting for jobs.

If you need to change the port of Jenkins standard configuration, it can be changed by editing the jenkins.xml file (change httpPort=8080) which is located in the installation directory (choosen during installation).

This was my original config - useful to increase heapsize etc:
<service>
  <id>jenkins</id>
  <name>Jenkins</name>
  <description>This service runs Jenkins continuous integration system.</description>
  <env name="JENKINS_HOME" value="%BASE%"/>
  <!--
    if you'd like to run Jenkins with a specific version of Java, specify a full path to java.exe.
    The following value assumes that you have java in your PATH.
  -->
  <executable>%BASE%\jre\bin\java</executable>
  <arguments>-Xrs -Xmx256m -Dhudson.lifecycle=hudson.lifecycle.WindowsServiceLifecycle -jar "%BASE%\jenkins.war" --httpPort=8080</arguments>
  <!--
    interactive flag causes the empty black Java window to be displayed.
    I'm still debugging this.
  <interactive />
  -->
  <logmode>rotate</logmode>

  <onfailure action="restart" />
</service>
After applying any change, restart the Jenkins Service using e.g. the Windows Task Manager. For this article I changed the Jenkins Port to 6060.
For more details (e.g. issues or advanced config, such as installing jenkins as a slave, check out: the jenkins wiki.
Preparation of BW5.12 scripted deployment
Within TIBCO BusinessWorks 5.12 ear-files (deployable artifact) are created via the TIBCO Utility/Script BuildEar. The deployment is done via the AppManage Utility. Both are available after installation of BW TRA.
The AppManage utility must be run on a machine that is part of the administration domain you are updating.
Example manual steps for deploying an application:
AppManage -deploy -ear D:\jenkins\ears\deployment\helloworld_service2.ear -deployconfig D:\jenkins\ears\deployment\hello_service-bw5_dev.xml -cred D:\jenkins\cred.txt -app TestServices/hello-service -domain bw5_dev
In this case we would deploy & start a service within the TestServices folder. The AppManage Tool is located in the tra folder of your installation (e.g. C:\tibco\tra\5.9\bin).
The ear file can be created automatically via the build tool:
buildear.exe -s -ear /helloworld_service.archive -o D:\jenkins\ears\deployment\helloworld_service2.ear -p C:\Users\Bob\Documents\bw5\helloworld_service
Options:
- ear) takes the name of the project archive file, don’t forget the leading slasch!
- o) is the ouptut directory
- p) is the directory of the project (where the archive file is located)
The buildear is located in the same directory as the AppManage Tool.
For more specific explanations check the Tibco Documentation!
Before deploying, as mentioned before, the config file has to be created (by AppManage) and adjusted to the target environment where the deployment will happen (usually a clever script).
Export the config of an existing ear.
AppManage -export -ear D:\jenkins\ears\deployment\helloworld_service2.ear -out D:\jenkins\ears\deployment\helloworld_service2.xml
Or, in any case following command can be useful to export a current config from the Admin. It helps to understand what has to be changed inside the config file (when you are setting up things the first time)…
AppManage -export -app TestServices/helloworld_service -out D:/jenkins/helloworld_service.xml -domain bw5_dev -cred D:\jenkins\cred.txt
Next steps will include
- Jenkins/Git Integration
- automated checkout by Jekins
- automated deployment by Jekins
Nov 27, 2014
It seems that we are back to the future: 2015 will be the year where discussions about Customer Experience Management will gain even more speed. A lot of companies are trying to push tools out to the space.
They adress challenges of our new and modern world:
30 years ago, there were small local shops (in Germany so called “Tante Emma Laden”), they knew you as a customer and most of the time even your needs. They knew even your family and possibly have seen you growing and growing to an adult.
So, when you stepped in once a week, they were already prepared with your usual shopping list…and when it was sommer - they put some sun blocker on top. Possibly they remembered you’ve broken your sun glasses last sommer, asking you if you want to buy one. On the other days, they already prepared you the right news-paper. And when it was week-end, it was time for your favorite “Croissant”.
Nowadays this intense relationship to the customer got lost - and what do you do? You try to collect as much data as possible to gain insights of the customer: the feelings, the (actual) needs and even predictions what she/he might need in the future.
Tibco is placing the Engage Platform into the bet.
Nov 24, 2014
Kickstart BW5.12 Project
I have created the a small make file to speed up BusinessWorks Designer Project creation. Additionally it creates some sub-directories which helps keeping the project structure clean.
I will possibly update the make file, so be sure to subscribe to the git repo!
Usage:
make project='somename'
Here comes the make file (can be found in my GitHub repository). It takes an existing bw project stored in a (hidden) directory under .template and copies it to the target project name. It then replaces the name in some files and creates some additional sub-directories.
# Makefile
# Created to speed up initialization of a TIBCO BW 5.12 project
# by Hannes Lehmann
#

PROJ=${project}
PROJDIR=
DESIGNER_BASE=/data/tibco/designer/5.9

run:
ifdef PROJ
	@echo Creating skeleton for a new project called: $(project)
	@mkdir -p ${project}/Schemas
	@mkdir -p ${project}/Processes
	@mkdir -p ${project}/Services
	@mkdir -p ${project}/Resources
	@cp -R .template/* $(PROJ)
	@sed -i 's/1template1/${project}/g' ${project}/vcrepo.dat
	@sed -i 's/1template1/${project}/g' ${project}/defaultVars/defaultVars.substvar
else
	@echo Nothing done, try to pass an argument project=
endif

launch:
	cd $(DESIGNER_BASE)/bin/ && $(DESIGNER_BASE)/bin/designer $(CURDIR)/$(PROJ)
	cd $(DIR)
What I do with this script is: run it for creating a new BW project. Before you can use it, either you:
- create a project called ‘1template1’ and change the directory to ‘.template’
- clone the git repo.
Eventually I will add additional functionality to the script (possibly remove the dependency on the template project).
Best Practice for BW project structure
Create some folder insider your project collecting/grouping functions together. For example the Makefile above will create following directories:
- Schemas (for XSDs, WSDLs, etc.)
- Processes (put your bw processes here)
- Services (if any WebServices are created, collect them here)
- Resources (any http, jdbc or whatever else is needed)
This is only a recommendation and a really flat hierarchy. Avoid to create to many folders/subdirs as it should still be usable (remember: some OSses/Systems don’t like really long path names).
Nov 20, 2014
Markdown for documenting
I have created the first small bash script to help ease my Markdown workflow.
Usage:
whatchme.sh file.md 'grep "^#" file.md'
Here comes the script (can be found in my GitHub repository for cloning/forking as well!). I found most of it in a forum, thanks to that guys!
#!/bin/bash
# Script by Hannes Lehmann
# Use it, when you need it

if (( $# < 2 )); then
    echo "Not enough arguments passed to whatchme!"
    echo "Provide the filename as first argument,"
    echo "and the command to be executed as second argument."
    echo "example: whatchme.sh file.md 'grep something file.md'"
    exit 1
fi

while true
do
   ATIME=`stat -c %Z $1`

   if [[ "$ATIME" != "$LTIME" ]]
   then
	clear
       	eval $2
       	LTIME=$ATIME
   fi
   sleep 1
done
What I do with this script is: run it in a separate / parallel shell to my editor (where I am editing the current markdown document) to have a fast overview of the chapters and their structure.
The next day I will enhance the script with automated chapter numbering to increase the structural view.
Nov 19, 2014
Hello from Hugo! And hello from Hannes! This is my first blog entry, realized thanks to Hugo; written in Markdown.
Hugo
Here’s a the link to Hugo.
I will optimize my build process (make file already created) and will post findings here and in GitHub.
Showing off with Markdown
A full cheat sheet can be found here
or through Google.
Hosted on GitHub
How a page in GitHub can be hosted is described here. It’s so easy and fast to publish pages via git pull/add/commit/push!